Teaching Calm Lead Exits From the Car
Why Calm Car Exits Matter
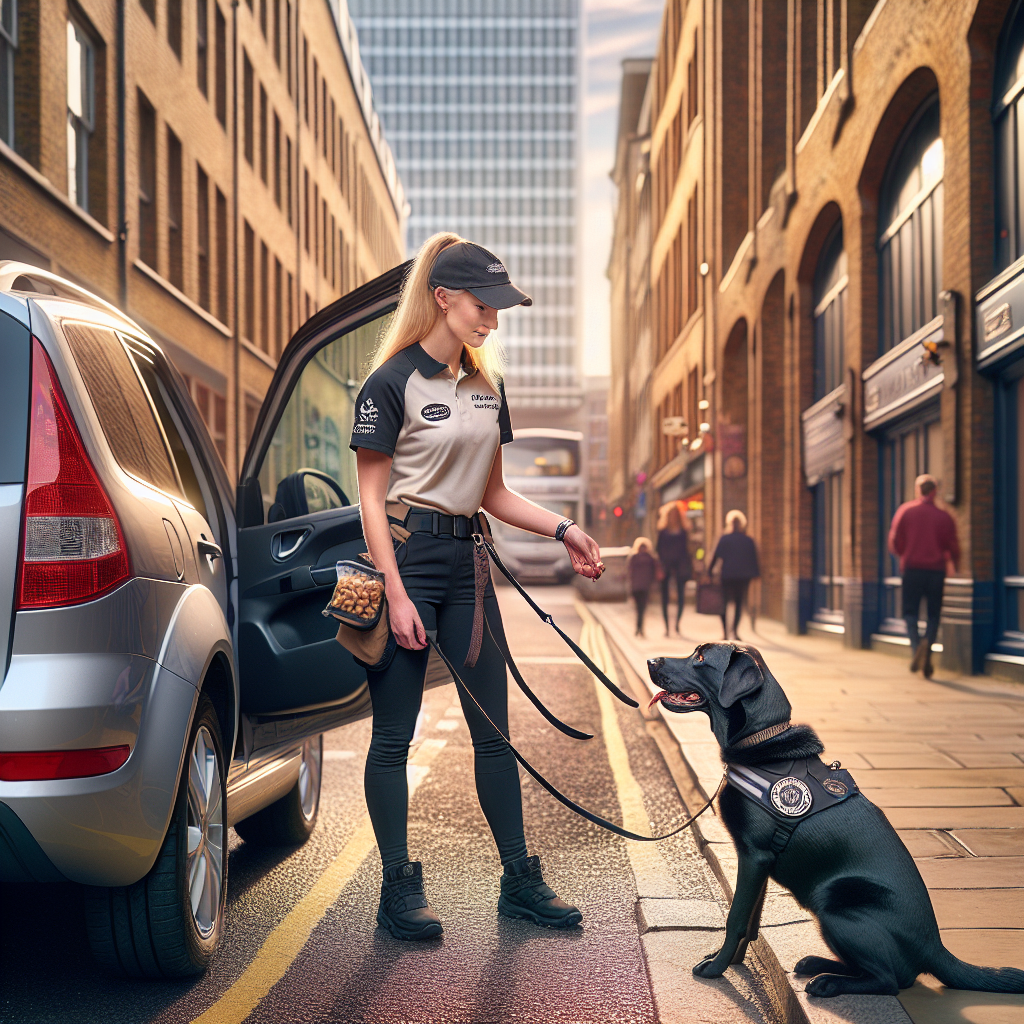
Kerbside moments are high risk. Traffic moves, doors swing, and excitement spikes the second a car door opens. Teaching Calm Lead Exits From the Car protects your dog, your family, and other road users. It also sets the tone for the entire walk. Start calm, stay calm. At Smart Dog Training, we make calm exits a core life skill across every programme, taught by a certified Smart Master Dog Trainer so you get reliable results in real life.
When your dog waits, focuses, and only steps out on a clear release cue, you gain control without conflict. The habit becomes automatic, even when the street is busy, the park is in sight, or another dog passes by. Teaching Calm Lead Exits From the Car is not a trick. It is a safety protocol that blends structure, motivation, and clear communication.
The Smart Method Applied to Car Exits
Every Smart programme follows the Smart Method, our proprietary system for calm, consistent behaviour. Teaching Calm Lead Exits From the Car uses all five pillars so your dog understands and performs under pressure.
Clarity
Your dog should always understand what earns release. We use clear markers for correct choices and a consistent release cue that means step out now. No guessing, no grey areas.
Pressure and Release
We use fair guidance on the lead to prevent self release, then remove pressure and reward when your dog holds position. This builds accountability without a fight and teaches your dog how to make better choices.
Motivation
Rewards drive engagement. Food, praise, and the walk itself reinforce calm posture at the door. Dogs repeat what pays, so we pay for stillness and focus.
Progression
We start in low distraction settings, then layer difficulty. Different cars, busy kerbs, school runs, and new surfaces all become part of the plan. Teaching Calm Lead Exits From the Car must work anywhere, not only in your driveway.
Trust
Consistent rules and fair feedback grow confidence. Your dog trusts that your cues matter and that you will keep them safe at the door and at the kerb.
Equipment Checklist for Success
- Well fitted flat collar or suitable training collar recommended by your Smart trainer
- Standard 1.2 to 1.8 metre lead, not a flexi lead
- High value treats in a pouch for quick delivery
- Non slip mat or towel to create a stable place inside the car if needed
- Safe parking area to begin practice
Keep gear simple and consistent. Teaching Calm Lead Exits From the Car relies on clear handling, not gimmicks.
Foundation Skills to Build Indoors
Before you go to the driveway, build these skills inside. They create the control you will later need at the car.
- Name recognition and eye contact on cue
- Sit or stand on place until released
- Marker words for yes, good, and release
- Gentle lead pressure and soft following
With these in place, Teaching Calm Lead Exits From the Car becomes far easier and cleaner.
Teaching Calm Lead Exits From the Car Step by Step
Follow this plan exactly. Keep sessions short, two to five minutes, and end on success. If your dog fails, you asked for too much too soon.
Step 1 Pattern the Door Ritual
Park in a quiet spot. With your dog secured in the car, attach the lead. Stand still, calm voice, no tension on the lead. Touch the door handle, then remove your hand. Reward your dog for staying put. Repeat until your dog shows no rush when you reach for the handle.
Open the door five centimetres and close it. Reward for staying. You are teaching that door movement does not predict exit. This is the heart of Teaching Calm Lead Exits From the Car.
Step 2 Add the Marker and the Release Cue
Choose a release cue like Free or Break. Mark stillness with yes and feed in place. Then say your release cue and invite a single step forward, immediately guiding your dog back inside and paying again for stillness. Your dog learns that release is controlled by your cue, not the door, and that calm pays.
Step 3 Open the Door Without a Break
Now open the door fully while your dog stays inside. Keep the lead loose but short. If your dog tries to move, gently guide back to the start point, close the door a little, wait for stillness, and pay. Repeat until the open door no longer triggers motion. Teaching Calm Lead Exits From the Car means the door is just a door, not an invitation.
Step 4 Step Out on Cue
When your dog can hold still with the door open, give the release cue and step out together at a controlled pace. Mark the first calm step with good and feed at your side with the nose pointed toward you, not the street. Stand, reset, and practice again.
Step 5 Add Duration and Distractions
Increase the time your dog waits with the door open, then add light distractions. Drop a treat outside but do not release. Have a family member walk past. If your dog breaks, guide back, close the door slightly, and reduce the challenge. Teaching Calm Lead Exits From the Car thrives on small wins stacked over time.
Step 6 Change Cars and Locations
Proof the skill in different vehicles and at real kerbs. Practice at the park, a petrol station forecourt, and a busy school run zone. Structure beats luck. With repetition, your dog will exit calmly anywhere.
Handler Skills That Make the Difference
- Neutral posture and soft hands on the lead
- Quiet voice, short cues, no chatter
- Consistent marker words for stillness and release
- Reward placement toward you, not toward distractions
- Reset quickly after any error
Small handler errors create big dog errors. Teaching Calm Lead Exits From the Car is precise work. If you need coaching, work with a Smart Master Dog Trainer for tailored feedback that speeds results.
Solving Common Problems at the Car Door
Dog Launches as Soon as the Door Cracks Open
Go back to Step 1 and 2. Shorten the lead, open the door two centimetres, close, and pay for stillness. Repeat until the hinge movement no longer predicts a launch.
Whining or Barking in the Boot
Whining means your dog is over aroused. Reduce time in the car, break up the routine, and start sessions when your dog is not staring at a park field. Reinforce quiet and stillness. If needed, cover the crate or switch parking orientation so your dog faces away from the action while you work.
Pawing, Scratching, or Climbing Over You
Install a place target inside the car. Pay for four feet on the mat. Only release from the mat. Teaching Calm Lead Exits From the Car is easier when your dog has a clear job.
Pulling the Moment Paws Touch the Ground
Freeze. Do not step. Reset back into the car, pay for stillness, and try again. Reward the first two calm steps on the ground. If pulling returns, you progressed too fast.
Building Reliability With the Smart Progression Plan
Reliability comes from structured progression. Use this weekly plan as a guide.
- Week 1 Quiet driveway. Door opens and closes. Release to one or two calm steps.
- Week 2 Drive to three new places. Vary side of the car. Release to five calm steps, then a short walk.
- Week 3 Light distractions. A friend walks past, another dog at distance. Longer door open duration before release.
- Week 4 Busy kerbs. School run traffic at a safe distance. Add rain, wind, and different surfaces.
Keep sessions short and sweet. Teaching Calm Lead Exits From the Car should stay positive and predictable.
Safety Protocols Everyone Should Follow
- Attach the lead before you open the door
- Park so your dog exits on the kerbside
- Scan for cyclists, scooters, and children before release
- Use a crate or seat belt harness for travel
- Do not use a flexi lead near traffic
Safety first, then training. Structure keeps your dog safe while you build the habit.
How Rewards Work at the Car
Rewards are payment for behaviour. With Teaching Calm Lead Exits From the Car, we pay for stillness, eye contact, and clean first steps. Use small food rewards early. Fade to life rewards like moving to the grass, sniff time, or meeting family. Pay more in hard places. Pay less in easy places. Your dog learns to hold the line even when the world is exciting.
What To Do When Mistakes Happen
- Interrupt calmly and guide back inside
- Close the door a little to reduce temptation
- Wait for stillness, mark, and pay
- Lower criteria by one or two steps, then try again
Mistakes are information. Your dog is telling you the step was too big. Adjust, then succeed. Teaching Calm Lead Exits From the Car grows from many tiny correct reps.
Real Life Proofing Scenarios
- School run with scooters and bags swinging
- Park car park with dogs and balls flying
- Vet car park with anxious smells and sounds
- Petrol station with loud pumps and foot traffic
Start at distance, then move closer as your dog wins. Always pay for effort and keep the release cue sacred.
When You Need Professional Help
If your dog rehearses frantic exits, screams in the car, or has a history of bolting, bring in a professional. A certified Smart Master Dog Trainer will assess the triggers, adjust handling, and build a plan that fits your dog and your routine. You will get hands on coaching that makes Teaching Calm Lead Exits From the Car safe and efficient.
Ready to turn your dog’s behaviour around? Book a Free Assessment and connect with a certified Smart Master Dog Trainer, available across the UK.
Case Study Results With Smart Clients
A family with a young Spaniel struggled with door launches and car park chaos. In week one we installed stillness inside the hatch with the door cracked open. By week two the dog waited five seconds with the door fully open at two new locations. In week three we added school traffic at distance and rewarded quiet. By week four the dog exited on cue at a busy park and walked off in a loose heel. The habit held because the Smart Method built clarity, pressure and release, motivation, progression, and trust at each step.
Frequently Asked Questions
What is the best age to start Teaching Calm Lead Exits From the Car?
Start as soon as your puppy is safe to travel. Use short, gentle sessions. Adult dogs can learn just as well with the same steps.
Which release cue should I use?
Choose a short word that you do not say in daily chat. Free, Break, or Out all work. Use one cue only and protect its meaning.
How long should my dog wait before I release?
Begin with one to two seconds, then build to five to ten seconds in easy places. In busy areas add more time to ensure your dog is settled before stepping out.
Do I feed every time forever?
No. In early training, pay often. Later, switch to life rewards like moving to grass or starting the walk. Still pay with food at hard locations.
What if my dog is crated in the car?
Open the crate door with the boot still closed to build stillness. Then open the boot a little, reward calm, and follow the same release process.
Can this help with car sickness or anxiety?
Calm exits reduce overall arousal which can help. For true motion sickness or panic, a tailored Smart behaviour plan is best.
Will a harness or collar make training easier?
Use the equipment your Smart trainer recommends for your dog. The method, not the gadget, creates the result.
Conclusion
Teaching Calm Lead Exits From the Car is a simple, life saving habit when you follow a structured plan. Start with stillness, add a clear release cue, and progress across different cars and locations. Reward correct choices, reset errors without drama, and always protect safety first. With the Smart Method, you will turn chaotic kerbside moments into calm, confident exits that last. Your dog deserves training that truly works. With certified Smart Master Dog Trainers nationwide, you will get proven results backed by the UK’s most trusted dog training network. Find a Trainer Near You
Related Articles
Why Obedience During Family Chaos Matters
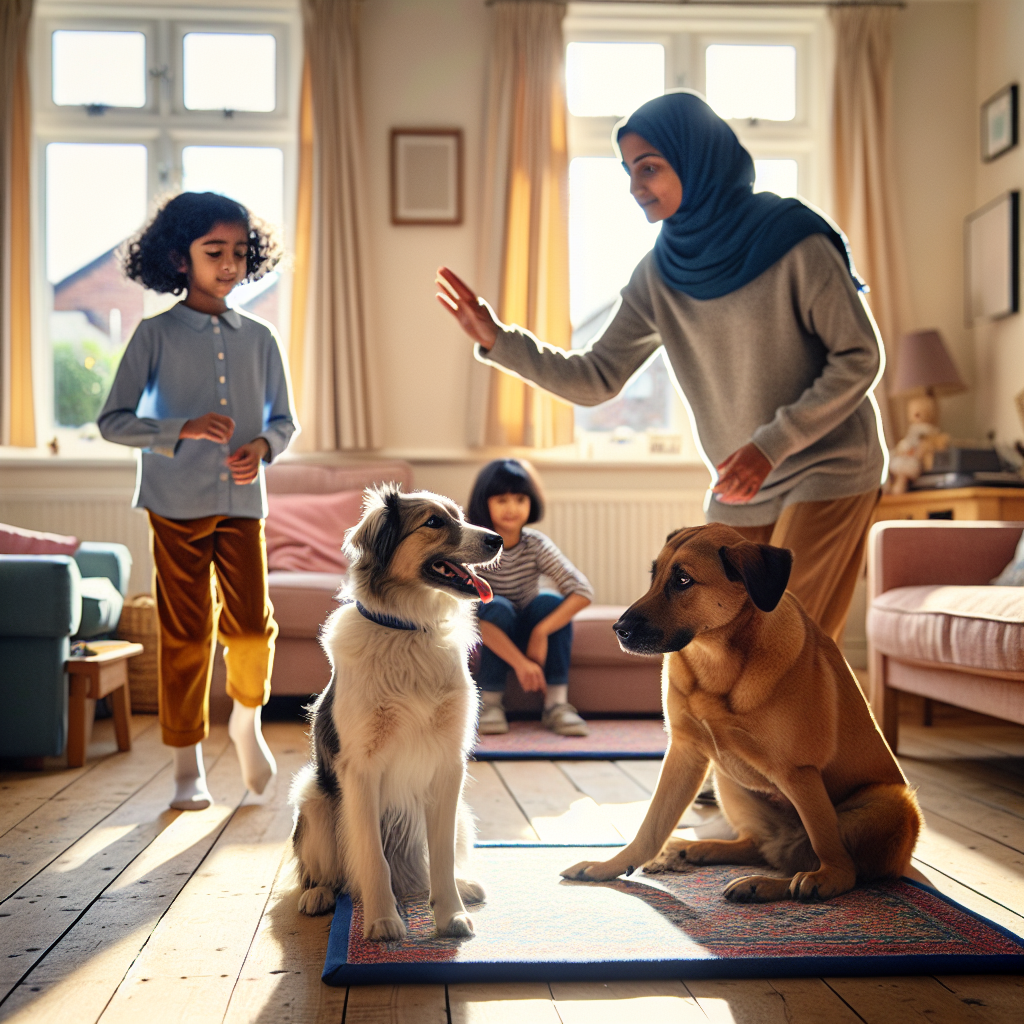
Busy homes are wonderful, but they can be hard on a dog. School runs, visitors, deliveries, children playing, and loud TVs can lead to barking, jumping, and frantic energy. Obedience during family chaos is not about making your dog dull. It is about building calm choices, reliable manners, and steady focus when life is loud. At Smart Dog Training, our structured approach produces behaviour that holds up anywhere, not just in quiet practice sessions.
The Smart Method is the foundation for obedience during family chaos. It balances clarity, pressure and release, motivation, progression, and trust. This method keeps training fair and consistent while making your dog eager to work. If you want expert guidance, a Smart Master Dog Trainer can map a programme around your family’s routine and support you through every stage.
The Smart Method That Works at Home
Every Smart programme follows five pillars that turn chaos into clarity.
- Clarity: Clear commands and markers remove guesswork so your dog knows what to do.
- Pressure and Release: Fair guidance followed by a clear release builds responsibility without conflict.
- Motivation: Rewards create positive emotions and a desire to participate.
- Progression: We add distraction, duration, and difficulty step by step until reliable anywhere.
- Trust: Consistent leadership strengthens the bond and produces calm, confident behaviour.
These pillars guide how we build obedience during family chaos in a way that lasts.
What Family Chaos Looks Like for Your Dog
Household noise and movement add stress. Dogs struggle when rules change or the environment overwhelms them. Typical triggers include doorbells, children running, playdates, meal prep, video games, and visitors who arrive excited. Without a plan, dogs fall back on barking, chasing, scavenging, and jumping. Smart programmes teach your dog what to do instead, then proof those skills in real life.
Foundation Skills for Calm Behaviour
Strong foundations make obedience during family chaos possible. Start here and build layer by layer.
Marker Language and Command Structure
We teach a simple language so your dog understands when they are right, when to keep working, and when they are done.
- Command: The cue that tells the dog what to do.
- Yes: A marker that ends the behaviour and leads to a reward.
- Good: A marker that means keep going, you are doing well.
- Free: A release that ends the exercise so your dog can relax.
Smart trainers keep markers crisp and consistent. That clarity is vital when the house gets loud.
Teach the Release Word
Dogs often break positions because they think the job is over. A clear release word fixes that. Ask for a Sit or Down, reward with Good while the behaviour continues, then Free to end. This simple structure keeps your dog steady even when distractions pop up.
Place Training as the Household Anchor
Place is the skill that transforms busy homes. Your dog goes to a bed or mat and remains there until released. It is a calm, controlled spot that reduces pacing, door dashing, and counter surfing. Place gives your dog a job to do, which lowers stress and prevents chaos from snowballing.
Step by Step Place Training
- Introduce the Mat: Guide your dog on, mark Yes, and reward.
- Add Duration: Use Good to reinforce staying put for a few seconds, then Free.
- Build Distance: Take a step away, return to reward, then Free.
- Change Positions: Ask for Down on the mat for deeper relaxation.
Proof Place Against Real Life
- Kitchen Prep: Ask for Place while you cook. Reward calm. Free when you finish.
- Homework Time: Children at the table, dog on Place. Reward at intervals.
- TV and Music: Turn the volume up, keep your dog on Place, and pay for quiet.
This single skill improves obedience during family chaos across the whole house.
Recall That Cuts Through Noise
Reliable recall is the safety line. Build it indoors first, then add movement and sound.
- Name Game: Say your dog’s name. When they orient to you, mark Yes and reward.
- Short Recalls: From 2 to 3 metres, back away playfully as they run to you.
- Layer Distraction: Add a family member walking past, then a toy on the floor, then kids chatting.
- Outdoor Proofing: Garden first, then front drive, then controlled park sessions.
Keep rewards high value and your voice upbeat. Progression makes recall dependable during family chaos.
Loose Lead Walking in Busy Spaces
Indoor practice teaches the pattern. Stand still until the lead softens, mark Yes, and move forward. Repeat every few steps. Then add movement at the door, past the bins, and by the school gate. If the lead goes tight, you stop. When the lead softens, you go. Pressure and release guides without conflict and builds clean walking even when life is bustling.
Impulse Control Around Doors and Food
Choose simple rules and keep them the same for everyone in the house.
- Doorway Manners: Sit at the door. Lead clipped on, wait, eye contact, then Free through.
- Food Time: Bowl down only when your dog waits politely on Place. Release to eat.
- Drop and Leave: Practice trades with toys and chews. Mark Yes for letting go, then give the item back often.
These rules create obedience during family chaos because your dog learns there is a right choice in every daily moment.
Kids and Dogs Working as a Team
Clear boundaries keep everyone safe and happy. Children can help with easy parts of training while adults handle the rest.
- Safe Zones: A crate or Place is off limits for play. It is a rest space.
- Calm Greetings: No hugging or grabbing. Ask for Sit, then gentle strokes under the chin.
- Structured Games: Short recall games with an adult present build teamwork and trust.
When children follow simple rules, obedience during family chaos becomes second nature.
Visitor and Delivery Protocol
Have a plan for guests and stick to it every time.
- Pre Doorbell: Dog on Place before visitors arrive.
- Open Door: Maintain Place. Use Good for staying calm while the door opens.
- Greeting: Only when your dog holds a Sit will you allow a brief greeting. If they break, pause, reset to Place, and try again.
Over a few visits, your dog learns the door is a routine, not a party.
Managing High Energy Times
Early mornings and early evenings can be wild. Use rhythm to your advantage.
- Morning Reset: Quick Place session after the first toilet break. Five minutes of focus sets the tone.
- Pre Dinner Calm: Place while you prep food. Short walk or play after the meal.
- Evening Wind Down: Sniff walk or puzzle feeder, then Place to settle before bed.
Daily rhythm is the quiet engine of obedience during family chaos.
Games That Build Stability
Turn training into play that rewards self control.
- Red Light Green Light: Walk together. When you stop, your dog sits. When you go, they go.
- Find It on Cue: Scatter a few treats, then recall off the search. This builds response even when excited.
- Zen Door: Approach the door. If your dog leans forward, you step back. When they wait, you step forward and release through.
Short games deliver high impact without overstimulating the house.
Fair Guidance Using Pressure and Release
Pressure and release is a Smart Method pillar. It is simple and humane. You apply gentle guidance to show the right choice, then release pressure the moment your dog makes that choice. The release is the dog’s reward because it brings clarity and comfort. This approach avoids nagging and gives your dog responsibility. It is a key reason our clients see dependable obedience during family chaos.
Motivation That Beats Distractions
Rewards are more than food. Use what matters to your dog in the moment.
- Food: Perfect for precision and repetition.
- Toys: Great for energy and drive after a few reps.
- Life Rewards: Go sniff, greet a friend, hop into the car. Real life fun for real life behaviour.
When motivation is strategic, your dog will choose you over the chaos.
Troubleshooting Common Problems
Barking at Movement and Noise
Pre load Place before activity starts. Reward quiet watching. If barking kicks off, calmly reset to an easier stage, then rebuild. Structure beats shouting every time.
Jumping on Guests
Visitors only greet when your dog holds Sit. If they break, the greeting ends. This pressure and release turns manners into access to people, which is the real reward.
Chasing Children
Use Place while kids play. Release for short recall games with adults managing the rules. Over time, chasing fades because it no longer brings fun.
Counter Surfing
During food prep, Place pays well. Add Leave practice with low stakes items first. Consistency closes the window of opportunity.
Daily Routine and Checklist
Use this Smart checklist to keep training simple.
- Morning: Toilet, Place for five minutes, short recall game.
- Midday: Loose lead walk, two Place breaks at home.
- Afternoon: Doorway manners practice during a delivery or school run.
- Evening: Food waiting routine, sniff walk or puzzle, calm Place before bed.
Tick these off and you will see steady gains in obedience during family chaos.
Coaching the Whole Family
Dogs thrive when rules do not change. Post your markers and rules on the fridge so everyone matches the same words and steps. Hold short family practice sessions twice a week. Rotate who handles Place, who opens the door, and who plays the recall game. Shared responsibility builds trust and speeds results.
When to Bring in Professional Support
If your dog shows anxiety, reactivity, or resource guarding, you need a tailored plan. A Smart Master Dog Trainer will assess your home, set clear goals, and coach you through the Smart Method with progression that fits your dog and your schedule. We work in real environments so success transfers to daily life.
Ready to turn your dog’s behaviour around? Book a Free Assessment and connect with a certified Smart Master Dog Trainer - available across the UK.
Case Study Style Framework You Can Use
Here is how we apply Smart structure in a typical busy home with two school age children and a friendly adolescent dog.
- Week 1 Foundations: Install marker language and the release word. Begin Place with five second holds. One short recall session indoors daily.
- Week 2 Household Habits: Add Place to meal prep and homework. Doorway sit and release routine. Walks focus on soft lead and short sits.
- Week 3 Distraction Work: Kids practise walking past Place. TV on during Place. Add outdoor recalls in the garden.
- Week 4 Real Life Proof: Visitor protocol with a neighbour. Short park trip with structured entry and exit. Maintain evening wind down.
By the end of week four, most families report less barking, clean greetings, and calm periods that felt impossible before. This is obedience during family chaos made practical.
Progression Roadmap for Reliability
Progression makes skills strong, so we move step by step.
- Distraction: Add one moving part at a time. People walking, then objects falling, then sound.
- Duration: Count in your head. Five seconds becomes ten, then thirty, then one minute.
- Distance: Start within arm’s reach. Add a step away, then around a corner, then out of sight for a moment.
If a step fails, drop back to the last success and rebuild. Smart programmes always protect confidence while raising standards.
Safety, Welfare, and Fair Expectations
Dogs need rest, exercise, and mental work. Use Place for off switches, walks for movement, and training for the brain. Keep sessions short and upbeat. If your dog is ill, in pain, or overtired, adjust your plan and contact a professional for guidance.
FAQs on Obedience During Family Chaos
How long does it take to see results?
Most families see calmer behaviour within two weeks when they follow the Smart Method daily. Strong reliability under distraction usually builds over four to eight weeks of steady practice.
Can young children be part of training?
Yes, with adult supervision. Give children simple jobs like delivering treats to Place or calling the dog for a short recall. Adults manage doors, visitors, and lead work.
What if my dog will not stay on Place?
Shorten the hold time, reduce distractions, and increase rewards. Use Good to pay for staying, and Free to end. Progress slowly and wins will stack up.
How do I stop barking at the doorbell?
Pre load Place before the ring. Reward quiet watching. Rehearse with a family member using the bell, then add real deliveries with the same plan.
Do I need special equipment?
You need a mat for Place, a well fitted lead, a secure collar or harness, and a range of rewards. Your Smart trainer will recommend kit that fits your dog and programme.
When should I call a professional?
If you see anxiety, reactivity, or guarding, or if progress stalls, book help. A Smart Master Dog Trainer will tailor the plan and coach you in your home for faster, safer results.
Conclusion
Obedience during family chaos is not luck. It is the result of a clear plan, fair guidance, and steady practice. The Smart Method gives you the structure to build calm behaviour that lasts. Start with markers and Place, layer in recall and walking skills, and follow a simple daily routine. With consistency, your dog will stay focused and relaxed even when life is messy. If you want expert support, we are ready to help.
Your dog deserves training that truly works. With certified Smart Master Dog Trainers (SMDTs) nationwide, you'll get proven results backed by the UK's most trusted dog training network. Find a Trainer Near You
Obedience During Family Chaos
Why Independence Matters for Over Attached Dogs
Many families ask how to start building independence in over attached dogs without harming the bond. When a dog cannot settle unless you are in sight, daily life becomes stressful. You sneak to the bathroom, tiptoe around naps, and cancel plans because your dog might panic. Independence is not distance, it is confidence. At Smart Dog Training, we teach dogs to feel safe and capable whether you are two metres away or out for the school run. Our approach is the Smart Method, delivered by a certified Smart Master Dog Trainer. It builds calm, reliable behaviour that lasts in real-life settings.
Over attachment can look like shadowing you from room to room, whining when you stand up, or barking the moment you open a door. It can also be subtle. A dog who seems fine at home but melts down at a café when you pop inside has the same core issue. Building independence in over attached dogs is about giving structure, clarity, and fair boundaries so your dog learns to regulate their emotions.
Signs Your Dog Is Over Attached
- Shadowing and constant checking in, even during rest
- Whining, pacing, or pawing when you move away
- Explosive greetings after short absences
- Lack of sleep unless a person is nearby
- Inability to settle on a bed or mat without contact
- Guarding a person from other dogs or family members
These patterns are not stubbornness. They are rehearsed habits that grow stronger each time they work. Building independence in over attached dogs begins with changing those patterns in small, controlled steps.
Myths That Hold Owners Back
- Myth 1 More cuddles will fix clinginess. Affection is wonderful, but without structure it can fuel dependency.
- Myth 2 You must ignore your dog to teach independence. We do not teach indifference. We teach calm choices through clear guidance and reward.
- Myth 3 Independence means long lonely hours. We build short, successful repetitions that create stability and trust.
The Smart Method for Building Independence
Smart Dog Training uses a proprietary, outcome-led system for building independence in over attached dogs. The Smart Method has five pillars that guide every step.
Clarity
Dogs relax when they know exactly what earns reward and what ends the exercise. We use precise commands and marker words so the dog can predict outcomes. Clear language removes guesswork.
Pressure and Release
Light, fair guidance shows a dog how to make the right choice. The instant they comply, the pressure ends and reward arrives. This teaches accountability without conflict and is central to building independence in over attached dogs.
Motivation
Food, toys, and praise are used with purpose to create focus and positive emotional states. Motivated dogs choose calm because it feels good.
Progression
We add distraction, duration, and distance in a structured way. Skills become reliable in the kitchen, then the hallway, then the café. Step by step builds real-world resilience.
Trust
The bond strengthens because communication is clean and consistent. The dog learns that your leadership creates safety. That trust is the engine of independence.
Step 1 Build a Calm Home Structure
Before separation games, stabilise the daily rhythm. Building independence in over attached dogs works best when the home has predictable patterns.
Set Predictable Routines
- Sleep windows Dogs need 16 to 18 hours of sleep across a day. Protect nap times after walks and training.
- Meal windows Feed at consistent times so energy and arousal are steady through the day.
- Training windows Short, focused sessions teach the brain to work, then switch off.
When the day has shape, your dog stops scanning every moment for what happens next. That alone reduces clinginess.
Teach Place for the Off Switch
Place training is the foundation of building independence in over attached dogs. Choose a raised bed or mat. Guide your dog on, mark “yes” when all four paws are on, and reward between the paws. Start with 10 to 20 seconds, then release with a clear word. Add calm leash guidance if needed, and always reward relaxation. Over days, expand duration and add mild distractions.
Crate and Confinement for Security
A crate or pen is a bedroom, not a punishment. Pair it with food, chews, and soft bedding. Close the door for short, successful reps during the day while you are home. The goal is comfort with neutral exits and entries. This environment gives your dog a safe place to practice being off duty.
Step 2 Clean Cues and Markers
Clarity is non negotiable. Building independence in over attached dogs depends on language that never changes and handling that is calm.
Release Words End the Exercise
Pick one release word like “free.” It should be the only signal that ends Place or a Sit. Without a release, many clingy dogs drift after you the moment you move. With a release, the dog learns to hold position while you go about your tasks.
Neutral Handling and Calm Exits
Practice standing up, picking up keys, or walking to the door while your dog remains on Place. If they step off, guide back with the lead, mark, and reward when calm. Keep your face and voice neutral. This shows your dog that movement does not predict fuss. It is a key part of building independence in over attached dogs.
Step 3 Progressive Separation Games
With Place growing strong, start tiny absences that succeed often. Short wins are the fastest route to stability.
Micro Absences and Threshold Work
- Close a door for two seconds while you stand outside, then return, pause, and release.
- Walk to the hallway for five seconds while your dog stays on Place. Return, pause, then reward.
- Open and close interior doors while your dog remains settled. Keep your energy low and predictable.
Gradually increase distance and then duration. The order matters. Add distance first, duration second, distraction third. That sequence keeps sessions achievable while building independence in over attached dogs.
Out of Sight with Clear Criteria
Move to brief out-of-sight reps. Step behind a doorframe for three to five seconds and return. If your dog vocalises, reduce the challenge and slow down. Your success criteria are quiet, still body language, and a soft face. Mark and reward those moments.
Step 4 Independence in Motion
Some dogs cling most when walking. They lean on the leg or freeze if the lead goes slack. We teach movement skills that reduce dependence on constant contact.
Loose Lead Without Clinging
Start in a low-distraction area. Walk in straight lines with a clear heel or follow cue. Use light lead pressure to guide, then release as soon as the dog chooses the right position. Reward at your knee, then vary the reinforcement schedule. As the dog learns the pattern, they stop checking your leg and start working the task. This is vital when building independence in over attached dogs outside the home.
Public Settles with You Disengaged
Practice Place or a down stay at a café table or park bench. Sit quietly. Do not stare or narrate. Mark and reward calm at intervals, then release. Over sessions, lengthen time and add mild distractions. Your dog learns that your stillness does not mean something is wrong. It means relax.
Step 5 Manage Affection and Attention
We love affection. We also structure it. Building independence in over attached dogs means the human attention economy becomes predictable.
Structured Affection
- Call your dog to you for fuss instead of responding to nudges.
- End affection with your release word so the session has a defined end.
- Use calm massage-like strokes instead of exciting play when you want a dog to settle.
Calm Greetings and Departures
Make arrivals and exits low key. When you come home, place your bag down, take a breath, then invite your dog to Place and greet there. When you leave, cue Place, wait for stillness, then exit without fanfare. This routine is a cornerstone of building independence in over attached dogs.
Step 6 Confidence Through Enrichment
Independence grows when dogs practice problem solving without human help.
Independent Activities
- Food puzzles that take 5 to 10 minutes
- Safe chew sessions during mat time
- Nosework games that your dog can complete solo
Set these up while you work nearby without engaging. Reward calm completion with a quiet “good.” Over time, do these in different rooms to generalise confidence.
Play With Rules
Play is wonderful when it teaches control. Use start and stop cues. Ask for a Sit before you re-engage. Rotate toys. Short, rules-based play teaches your dog to handle excitement, then switch off, which supports building independence in over attached dogs.
Step 7 Accountability and Fair Boundaries
Boundaries are not harsh. They are clear lines that help the dog relax. We use pressure and release with kindness so dogs learn how to succeed.
Lead and Place Boundaries
If your dog steps off Place without a release, guide back with light lead pressure, then release the moment they return. Mark and reward. On walks, guide to your chosen position. Release immediately when they comply. The fairness of the release teaches responsibility and reduces conflict.
Interrupting Attention Seeking
Jumping, pawing, and demand barking are requests you do not have to answer. Instead, guide the dog to Place, ask for stillness, mark, and reward when quiet. Over time, the dog learns which behaviours pay and which do not. This shift is central to building independence in over attached dogs.
Troubleshooting Common Setbacks
Whining or Barking
Check the last success point. Reduce duration or distance. Add more repetitions at the easier level. Increase your neutral handling and make rewards calmer. Often, a quick reset restores confidence.
Shadowing and Scanning
Increase Place time with you moving around the home. Reward soft eye blinks and relaxed posture. If your dog watches closely, add a chew on Place and step out of sight for brief reps.
Regression After a Holiday
Life happens. Go back one or two steps in the plan for a week. Rebuild clean repetitions. Because the patterns already exist, you will climb faster the second time. Consistency is your best friend when building independence in over attached dogs.
Multi Dog Homes
Teach each dog Place and crate time alone first. Then pair them for short sessions. If one dog fuels anxiety in the other, separate the sessions and progress each dog at their own pace.
Tracking Progress and Knowing When to Advance
What to Log
- Duration on Place without vocalising
- Distance you can move away comfortably
- Number of calm departures and returns each day
- Sleep totals across 24 hours
When to Level Up
Advance when you can do 10 calm reps in a row at the current level. Add either two seconds of duration or one metre of distance, not both. This measured climb is how Smart Dog Training keeps building independence in over attached dogs without creating setbacks.
Safety and Welfare First
Pain, gut upset, or hormonal changes can amplify anxiety. If your dog shows sudden behaviour change, consult your vet. Keep sessions short, surfaces safe, and equipment well fitted. If you feel stuck, get hands-on help early rather than pushing through frustration.
When to Work With a Smart Master Dog Trainer
If your dog panics, self harms, or cannot settle even with careful steps, partner with a professional. A Smart Master Dog Trainer will assess your dog, your routine, and your home layout, then design a plan that you can follow with confidence. SMDTs are certified through Smart University and mentored to deliver the Smart Method in real homes with real families.
Our programmes include in-home training, structured group classes, and tailored behaviour plans. We build actionable routines and coach you through daily life. That is the fastest path to building independence in over attached dogs and keeping results consistent long term.
Ready to turn your dog’s behaviour around? Book a Free Assessment and connect with a certified Smart Master Dog Trainer - available across the UK.
Example Daily Plan That Builds Independence
- Morning 20 minute walk with loose lead practice. Five minutes of Place at home after.
- Mid morning Three micro absences of 10 to 20 seconds each. Quiet rewards on return.
- Afternoon Enrichment chew on the mat while you work nearby for 10 minutes.
- Early evening Short training session Place with you moving around the house. Calm release, then rest.
- Bedtime Toilet break, then crate or bed with a soft chew for five minutes before lights out.
Repeat this flow most days, adjusting to your dog’s age and breed. The routine repeats make building independence in over attached dogs a predictable, low-stress process.
FAQs
How long does it take to see progress?
Most families see calmer settles within one to two weeks when they follow the plan daily. Full reliability takes longer. The path to building independence in over attached dogs depends on consistent practice and steady progression.
Is a crate required?
No. A crate is useful for many dogs, but you can use a pen or quiet room. The key is a defined rest space. Place training plus fair boundaries can still deliver strong independence.
Will this harm our bond?
Quite the opposite. Structured clarity reduces stress for both of you. Dogs trust leaders who are calm and consistent. That trust supports building independence in over attached dogs while keeping affection meaningful.
What if my dog cries when I leave the room?
Shorten the challenge. Work at a distance where your dog stays quiet, then build up one small step at a time. Reward calm, not noise. Many dogs improve quickly with this approach.
Can I use treats for every repetition?
Start with frequent rewards to build value. Then shift to variable reinforcement and include life rewards like access to the garden or a nap in the sun. Balance keeps behaviour strong.
Should I ignore my dog completely before I leave?
You do not need to ignore your dog. Keep your energy low, use Place, wait for stillness, then leave without fuss. Neutral exits prevent spikes in arousal.
What equipment do I need?
A stable Place bed, a well fitted flat collar or harness, a standard lead, and a few food rewards or chews. Keep tools simple and consistent.
When do I need professional help?
If there is intense distress, destruction, or self injury, contact us. A Smart Master Dog Trainer will tailor the plan and coach you through daily routines to keep your dog safe and progressing.
Conclusion
Building independence in over attached dogs is not about cold distance. It is about steady leadership, clean communication, and fair accountability. With the Smart Method, you create a calm home structure, teach place-based relaxation, and layer separation in small, successful steps. Your dog learns that your movement and absence are predictable and safe. The result is a confident companion who can rest, travel, and live well right beside you or on their own.
Your dog deserves training that truly works. With certified Smart Master Dog Trainers (SMDTs) nationwide, you'll get proven results backed by the UK's most trusted dog training network. Find a Trainer Near You

Building Independence in Over Attached Dogs